
So it’s about time we deploy a Counter-Strike server using Terraform
If you’ve read the title correctly (yes, you have), this is the story about how we’ve used Terraform to deploy CS. Click here to know how!

Using Terraform to deploy a CS: GO server in a single command
Well, welcome to a very unusual story.
If you’ve read the title correctly (and yes, you have), this is the story about how I’ve developed a Terraform module to deploy an entire CS: GO server in the Cloud using nothing but a single command.
That’s right, a single command. 🤯
But how in the world could we pull that out? If you’ve read the title correctly, you’ve also noticed that we used Terraform.
But what is Terraform, and why should you care?
Well, first of all, it can be used to deploy CS: GO servers, which is very important, case closed.
But do you know that it could also be used to deploy anything that you want?
There are many benefits to this approach, which is called Infrastructure as Code, or shortly, IaC.
Treating infrastructure as code simply means:
Write once, deploy many times.
Deploying infrastructure many times may seem like an odd idea to you. So let me clarify why it’s good to do IaC instead of manually provisioning infrastructure.
Why should I write code to manage my infrastructure?
I don't know how many times I’ve deployed a CS: GO server in my life.
In ZRP, sometimes we host Game Nights for everybody to chill out and play some games. A lot of people like to play free games, like Gartic and Among Us, but sometimes people like to go wild and play fancier games.
On more than an occasion, we’ve decided to play CS. But the time for deploying a server was so consuming that we ended up giving up and not playing at all.
Also once I accidentally crashed the server 👀 because my connection was so slow that the server couldn’t keep up, but that’s a story for another time.
So here we are, software developers contemplating the opportunity in our face to automate the task of building a server and deploying it without any human intervention.

“What kind of tools exist that could easily solve this task for us?” The developers asked. If you guessed IaC, you’re goddamn right.
So the first thing IaC is great at is automation. Automation, per se, is not an advantage, it must improve upon something. In our case, it was speed (the time it took us to have a running CS: GO server).
It let us deploy the server whenever we want nowadays, so if someone says, let’s do a Game Night, and people want to play CS, we could just, one hour before the event, run terraform and, boom, the server is up and running.
IaC is also great for another thing: cutting costs. In our case, and mostly for businesses, time is money, and allowing people to dedicate more of their energy to important stuff is great.
The last thing in our use case is that IaC reduces human errors, and oh boy, my first attempt at running a CS server manually was, to put it lightly, like being stabbed in the back on a friendly-fire match (of course I didn’t know a fraction of what I currently know, but there are a lot of mistakes one can make before understanding what went wrong).
So we’ve achieved a deployment that is almost entirely independent of developers while being error-free — at least, the ones that mattered to us — and fast to replicate. For me, these 3 aspects (speed, reducing costs, and consistency) are the main benefits of IaC.
To another extent, IaC is also a great tool for:
- Better security, because it allows systems to be better designed, and security could be thought ahead of development. It could also be hardened easier (meaning that you could encapsulate some security measures in a module, and replicate those modules elsewhere).
- Better communication, because code is a tool of communication. It uses language to let computers, and developers alike, understand intent, and behavior, and change it according. Readable infrastructure is very important for a strategy of improved understanding. A diagram, alone, can tell as much as the drawer intent, but IaC must convey all the information required to create the infrastructure.
- Better reviews, because — and this is one of my favorites — since most of our codebases nowadays are in Git anyway, you could just create a PR, review it, roll back to previous versions, and destroy code without fear of missing something important.
- Further automation, because automation has this unique snowball effect, especially if you automate right. It becomes almost invisible, to the point that you could automate the deployment of your infrastructure, and automate the testing required to deploy your infrastructure, and (…) you get the point.
- Eliminating configuration drift. I know, this one sounds fancier that the others, but it’s a simple effect of running dynamic resources. Those resources (servers, machines, IPs, etc…) could drift (change in time). This could happen because the service works this way, or because someone has changed the configuration manually. Since in an IaC setup our configuration is tightly integrated with our code, it will simply reapply all the settings we want, and preserve the correct configuration as fast as possible.
- It can tell you when something happened. Indirectly, it could be understood that this is simply a continuation of the communication and review process, and it is, but I’ve decided to highlight this because it is an invaluable point. Accountability is often critical in many organizations, especially at scale, and can help teams better communicate, while also protecting companies from malicious intents, so knowing why / how / when things changed is of uttermost importance.
- And last: replication, which is a very important point. We usually want to run copies of our infrastructure, at smaller and bigger scales, to develop and test changes in our environment, while also understanding how much a system can go beyond its current capabilities, people usually call this scalability, I like to call it future-proofing :)
So this is all great, and I think I could end the story here. We’ve used our knowledge from something we do all the time in projects to do something unusual because we understood that if you need to repeat yourself, don’t.
Automate it.
Is this the end? No, this is the beginning. This article is useless without some code, so I want to deep dive into the nuts and bolts of the code. If you like this article until now, give us some claps, it helps a lot 👏
Before we dive into the code
I will try to keep this section as introductory as possible, because you may not be familiar with some concepts (like using a CLI, opening a terminal, etc…), which is not the point of this story anyway.
Instead, we will focus on writing Terraform code, which uses HCL, a language written by Hashicorp, that aims to be a structured configuration language that is both human- and machine-friendly.
I want to explain to you the important parts, how this project works, and how you could make sense of it yourself on GitHub.
First of all, we must understand how a CS: GO server works, or, for that matter, how any game server works.
We will start from there and build up to Terraform.
Ready!?
How a CS: GO server (or any game server) works
A game server is a special type of server for multiplayer games that is solely responsible for tracking what is going on.
But what do I mean by “what is going on”?
Suppose you shoot a bullet using your gorgeous custom-painted signature AK-47, hitting another player in the process.
How the hell do you know that you hit that particular player?
Well, the server knows that you hit that particular player because the server knows it all (in computer science, the source of information that is considered the primary one is called an authoritative data source).
When a player joins a match, he must send events to the server, and the server must send all events to all players. Those events are the source of truth, the state in which our game is currently-in.
This state should be enough to reconstruct the entire game world.
This allows players to keep an up-to-date version of the match on their computers, so they “see” the same thing. When you shoot the player — in our example — the server knows where the player is, that you shoot a bullet, that the bullet collides with the player's hitbox in that instant, and that the shoot does X damage, based on where in the hitbox you hit.
After that, the server updates the player's position, health, and state of the world, so the player on the other side knows they were shoot.
The frequency at which the server updates the state of the world is fixed. In source servers, this is called a tick. The default tick is 64 times a second in CS: GO.
This is very complex, but the process used for transmitting those events is fairly direct. We establish — just like on the web — a session between us (the game client) and the server. The session is managed at the application level, but events are usually transported — properly — at the transport layer using a protocol called UDP.
There are a lot of complexities to deal with that we do not have the time to explore in this article, like latency, predicting stuff, and so on.
At the end of the article, I’ve left some useful materials for those who want to know more, particularly how Valve implemented the high-level concepts of the Source Multiplayer Networking Architecture.
Into the code
So now that we understand how a CS: GO server works, we must decide how and where we will deploy our server, so let’s do that first.
We usually use AWS, so that’s a no-brainer, it’s cheap for our use case, and well-documented.
In AWS, Linux instances are way cheaper than Windows machines, so we decided to use Linux and EC2.
Linux has this neat suite called LinuxGSM that manages game servers for us. They have instructions for installing and setting up a lot of different game servers, and so we’ve decided on them.
An important note is that, in our particular case, deciding how the server is actually started and managed is less important than it seems, as the underlying infrastructure does not change.
We just use some scripts to install the dependencies and services required, plus installing the game server. This means it’s fairly easy to just replace the scripts and use CSGOSL, CSGO Server Launcher, Docker, etc…I find the installation easier on Ubuntu, and since the underlying distro is not important, we will use that.
We also need a basic network setup on AWS, with at least a basic VPC with a public subnet and auto-assign IPv4 enabled to host our instance.
We also want to be able to connect to the instance remotely, so we will install a VNC server, although we will not explain how to use this in this article.
Coding the module
Finally, we’ve arrived at the coding section. Given that we know exactly what we want, let’s draw a diagram.
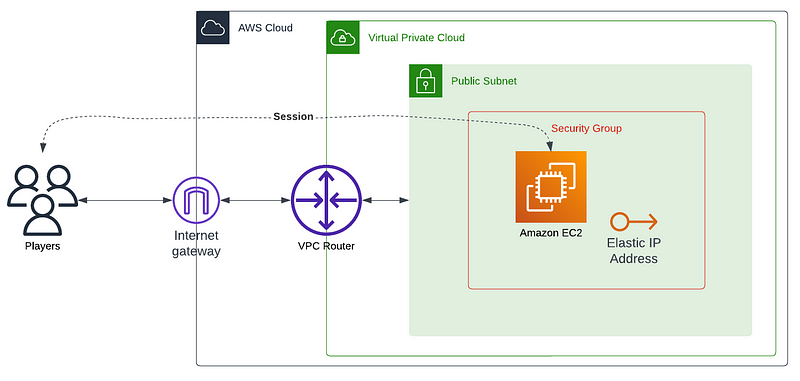
This diagram provides an overview of what is required.
Let’s start by setting up some files. Create a folder and create the following files inside that folder:
.
├── main.tf # where we develop our modules logic / resources
├── versions.tf # where we declare the providers versions for our resources
├── variables.tf # where we declare inputs
├── outputs.tf # where we declare outputs
├── terraform.tfvars # where we declare values for our inputs
├── scripts (d) # a directory for running scripts in the server
└── templates (d) # a directory for files that are required by the server
Within this setup, let’s first declare the required providers and the versions of these providers that are required for our module by using the versions.tf file:
terraform {
  required_version = ">= 1.0"

  required_providers {
    aws = {
      source  = "hashicorp/aws"
      version = ">= 4.56"
    }

    local  = {}
    tls    = {}
    random = {}
  }
}
The utility of some of those providers will be clear soon.
We will also add some common variables to the variables.tf file, these variables are useful for renaming resources and explaining which environment we’re currently in.
variable "app" {
  description = "The app name"
  default     = "csgo"
}

variable "env" {
  description = "The environment for the current application"
}
From now,localandvarwill appear throughout the code, and the variables from which they came will not be explicitly referenced, only in some special cases, to keep the focus on what matters most.
We can now open the main.tf and add the first things we need to create our system.
We first need a network, but we want the network to already exist. A public subnet usually exists within AWS, and there are a lot of already established modules that implement networking, so to make this setup more flexible, we just want a subnet_id .
We will use the subnet_id to retrieve the subnet, vpc, and default security group of the vpc:
data "aws_subnet" "public" {
  id = var.subnet_id
}

# Retrieve the provided subnet vpc and default security group
data "aws_vpc" "this" {
  id = data.aws_subnet.public.vpc_id
}

resource "aws_default_security_group" "this" {
  vpc_id = data.aws_vpc.this.id
}
Now we will create an SSH key pair that we will use to connect to the machine, and a random password to connect to our CS: GO server and manage it in the game (a rcon_password).
# Creates the RCON password
resource "random_password" "rcon_password" {
  length           = 8
  special          = true
  override_special = "_%@"
}

# Creates the SSH key pair
resource "tls_private_key" "ssh" {
  algorithm = "RSA"
  rsa_bits  = 4096
}

# Saves the private pem locally
resource "local_file" "id_rsa" {
  content         = tls_private_key.ssh.private_key_pem
  filename        = "${path.root}/id_rsa.pem"
  file_permission = 400
}

# Saves the public pem locally
resource "local_file" "id_rsa_pub" {
  content         = tls_private_key.ssh.public_key_pem
  filename        = "${path.root}/id_rsa.pub"
  file_permission = 755
}

# Saves the private pem in the cloud
resource "aws_ssm_parameter" "pk" {
  name  = "/${local.app}/${local.env}/SSHPrivateKey"
  type  = "SecureString"
  value = tls_private_key.ssh.private_key_pem
}

# Creates the key pair in EC2
resource "aws_key_pair" "ssh" {
  key_name   = join("-", [local.env, local.app, "ssh"])
  public_key = tls_private_key.ssh.public_key_openssh
}
This snippet creates a random password using the random provider, while also creating a key pair using the tls provider. The key pair is saved both locally, using the local provider, and remotely, using AWS SSM.
As we’ve decided for Ubuntu 20.04, we will query it directly from the public AMI repository.
# Find the latest release of Ubuntu 20
data "aws_ami" "ubuntu" {
  most_recent = true

  filter {
    name   = "name"
    values = ["ubuntu/images/hvm-ssd/ubuntu*20.04*amd64-server*"]
  }

  filter {
    name   = "virtualization-type"
    values = ["hvm"]
  }

  # Published by Canonical
  owners = ["099720109477"]
}
Now we’re almost done. The following bits are the basis for our server and are important to understand.
We will create an EC2 instance within our public subnet and attach to it an EIP (an IPv4 address).
We also will allow incoming traffic from ports required by the CS: GO server, and also for VNC and SSH communication.
# Creates the security group for incoming / outgoing traffic
module "security_group" {
  source      = "terraform-aws-modules/security-group/aws"
  version     = ">= 4.17"
  name        = join("-", [local.env, local.app, "security"])
  description = "CSGO Server Default Security Group"
  vpc_id      = local.vpc_id
  ingress_with_cidr_blocks = [
    {
      rule        = "ssh-tcp"
      cidr_blocks = "0.0.0.0/0"
    },
    {
      from_port   = 27000
      to_port     = 27020
      protocol    = "tcp"
      description = "CSGO TCP"
      cidr_blocks = "0.0.0.0/0"
    },
    {
      from_port   = 27000
      to_port     = 27020
      protocol    = "udp"
      description = "CSGO UDP"
      cidr_blocks = "0.0.0.0/0"
    },
    {
      from_port   = 5901
      to_port     = 5901
      protocol    = "tcp"
      description = "VNC"
      cidr_blocks = "0.0.0.0/0"
    }
  ]
  egress_rules            = ["all-all"]
  egress_cidr_blocks      = ["0.0.0.0/0"]
  egress_ipv6_cidr_blocks = ["::/0"]
}

# Create the server
resource "aws_instance" "server" {
  ami                         = data.aws_ami.ubuntu.id
  instance_type               = local.instance_type
  key_name                    = aws_key_pair.ssh.key_name
  associate_public_ip_address = true
  subnet_id                   = data.aws_subnet.public.id

  root_block_device {
    volume_size = 100
  }

  vpc_security_group_ids = [
    aws_default_security_group.this.id,
    module.security_group.security_group_id
  ]

  tags = {
    "Name" = join("-", [local.env, local.app, "instance"])
  }
}

# Associate an EIP with the created EC2 instance
resource "aws_eip" "this" {
  instance = aws_instance.server.id
  vpc      = true
}
This snippet is very important. It uses the key that we’ve generated, the AMI id we’ve found, and the subnet we provided to launch an instance of a given type in EC2.
But wait, where is the CS: GO server? 🤔
Remote Execution
Terraform allows us to execute scripts, locally or in the server, using what is called Provisioners.
Provisioners model specific actions on the local machine or on the remote machine to prepare servers or other infrastructure objects for service.
These actions are usually not easily representable as a resource or any other abstraction provided by Terraform, so they’re considered a last resort.
If you remember, we’ve created 2 folders at the beginning of this section (scripts and templates).
We will be using scripts to create a custom setup.sh script to install LinuxGSM on the server, while also installing the CS: GO server alongside it, and copying some files to the CS: GO server folder for customization.
But first, we must connect Terraform to the server. To connect to the remote server, we can use a connection block, which will provide the configuration required for the connection.
resource "aws_instance" "server" {
  # ...
  connection {
    host        = aws_instance.server.public_ip
    type        = "ssh"
    user        = "csgoserver"
    private_key = tls_private_key.ssh.private_key_pem
  }
}
As you can see, we’re using a user called csgoserver. This user does not exist by default on the Ubuntu 20.04 AMI, so we must create it.
Of course, this will not be done manually. Instead, we’re going to use a script called create-user.sh that will be executed before everything else. Since this script will connect to our server using a different user, we must add to this provisioner a different connection block.
resource "aws_instance" "server" {
  # ...

  # Create user for server
  provisioner "remote-exec" {
    connection {
      host        = aws_instance.server.public_ip
      type        = "ssh"
      user        = "ubuntu"
      private_key = tls_private_key.ssh.private_key_pem
    }

    script = "${path.module}/scripts/create-user.sh"
  }
}
Also, remember to add the scripts/create-user.sh script:
#!/usr/bin/env bash

# Create steam user
sudo adduser csgoserver --disabled-password -gecos ""

# Add csgoserver to sudo users
sudo usermod -aG sudo csgoserver
sudo su -c "echo 'csgoserver     ALL=(ALL) NOPASSWD:ALL' >> /etc/sudoers"

# Give .ssh access
sudo -i -u csgoserver bash <<EOF
# Give ssh access
mkdir -p .ssh
chmod 700 .ssh
touch .ssh/authorized_keys
chmod 600 .ssh/authorized_keys
TOKEN=$(curl -X PUT http://169.254.169.254/latest/api/token -H "X-aws-ec2-metadata-token-ttl-seconds: 21600")
curl -H "X-aws-ec2-metadata-token: $TOKEN" http://169.254.169.254/latest/meta-data/public-keys/0/openssh-key >> .ssh/authorized_keys
EOF

exit 0
Now we’ve created the user, granted it sudo access, and can configure our server. So we must execute the setup.sh script, and import the configuration files (which you can read more about in the LinuxGSM documentation at the end of the article).
The code is as follows:
data "template_file" "lgsm" {
  template = file("${path.module}/templates/lgsm.tpl")
  vars = {
    default_map       = "de_dust2"
    max_players       = "32"
    slack_alert       = local.slack_webhook_url != "" ? "on" : "off"
    tickrate          = local.tickrate
    slack_webhook_url = local.slack_webhook_url
    gslt              = local.gslt
  }
}

data "template_file" "server" {
  template = file("${path.module}/templates/server.tpl")
  vars = {
    hostname      = "ZRP"
    rcon_password = local.rcon_password
    sv_password   = local.sv_password
    sv_contact    = local.sv_contact
    sv_tags       = local.sv_tags
    sv_region     = local.sv_region
  }
}

data "template_file" "autoexec" {
  template = file("${path.module}/templates/autoexec.tpl")
}

resource "aws_instance" "server" {
  # ...

  # Runs the setup
  provisioner "remote-exec" {
    script = "${path.module}/scripts/setup.sh"
  }

  # Download and config CS:GO server
  provisioner "remote-exec" {
    inline = [
      "./csgoserver auto-install",
    ]
  }

  # Upload server config
  provisioner "file" {
    content     = data.template_file.lgsm.rendered
    destination = "/home/csgoserver/lgsm/config-lgsm/csgoserver/common.cfg"
  }

  provisioner "file" {
    content     = data.template_file.server.rendered
    destination = "/home/csgoserver/serverfiles/csgo/cfg/csgoserver.cfg"
  }

  provisioner "file" {
    content     = data.template_file.autoexec.rendered
    destination = "/home/csgoserver/serverfiles/csgo/cfg/autoexec.cfg"
  }

  # Start
  provisioner "remote-exec" {
    inline = [
      "chmod 775 /home/csgoserver/lgsm/config-lgsm/csgoserver/common.cfg",
      "chmod 775 /home/csgoserver/serverfiles/csgo/cfg/csgoserver.cfg",
      "chmod 775 /home/csgoserver/serverfiles/csgo/cfg/autoexec.cfg",
      "./csgoserver start",
    ]
  }
}
Notice that we are using template_file data, which means that we’re reading a template file (any text file) from the templates folder, and replacing the variables with the provided values.
That’s why in the file provisioners we call the rendered method, to get the final file.
In this snippet we execute the setup, copy some files, and finally, start the server.
From now on we need to manage the server manually, as we will not be able to update these files automatically. This is as intended, provisoners run once on create or destroy.
After you edit your configs within the server, you want to keep editing only on the server. A backup can be easily added, as we’ve done in the repository, so go to the repository and check it out.
 zrp
zrpFinally, deploying
After coding our infrastructure, it is showtime ✨
As promised at the beginning of the article, the deployment is a single line.
- First, copy the example in
examples/complete. - Generate a GSLT token from Steam (access https://steamcommunity.com/dev/managegameservers to generate, use app_id 730).
- Update the
main.tfconfig to match yours and replace the variables with your values. - Export your AWS_PROFILE or credentials.
- Run
terraform initto initialize and download the providers. - Run
terraform plan -out plan.outand review what will be created (don’t trust a random person on the internet, check what will be created). - Finally, deploy using
terraform apply "plan.out".
You’ve succeeded in deploying your own CS: GO server to AWS.
In the repository, there is further information on how to connect to the server and use VNC. Go check it out if you haven’t already.
Thank you for reading, I hope you’ve enjoyed this article as much as I did.
Feel free to add me on Steam. You can find more about me on my GitHub Profile Page.
Until next time! 👋
Materials that you might be interested
So the article is over, but if you’re interested in the topic of game servers, or want to know more about things that we’re not able to talk about in this article, check out the links below 🤓
 crazy-max


Comments ()